Just as a reminder as a few of the ingredients need to be either room temperature or softened; set out eggs for an hour for room temp and butter for an hour for softened (or 12 seconds in the microwave). For this recipe the butter needs to be really soft if you don't have a mixer (which I didn't). Also, if you don't want to buy a big bag of flour, they sell small bags too.
Chocolate
‘Cupcakes’ with Coffee Icing
Makes: ±20 cupcakes Cake prep time: 35 min. Bake time: 17-22 min.
Icing prep time: 25 min. Assembly time: 30 min. Total overall time: about 2 hours
Icing prep time: 25 min. Assembly time: 30 min. Total overall time: about 2 hours
Utensils needed:
measuring cups and spoons, small, medium, and large bowls, spatula, whisk,
jelly roll/sheet cake pan, butter knife, cup/rounded object, plastic bag, plates/containers
The Cake:
2
cups all-purpose flour 12
T. unsalted butter, softened
¾ cup cocoa powder 1 ¾ cups sugar
2 t. instant coffee 4 large eggs, room temp.
1 ½ t. baking soda 2 t. vanilla extract
½ t. salt 1 ½ cups whole milk, room temp.
¾ cup cocoa powder 1 ¾ cups sugar
2 t. instant coffee 4 large eggs, room temp.
1 ½ t. baking soda 2 t. vanilla extract
½ t. salt 1 ½ cups whole milk, room temp.
Set
the oven to 350 degrees and lightly butter or spray with vegetable oil a jelly
roll pan. Whisk flour, cocoa powder, instant coffee, baking soda, and salt
together in medium bowl and set aside.
 |
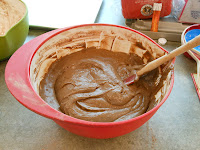
| Completely mixed batter |
Throughout
the recipe, periodically scrape down the sides of the bowl and clean out the
inside of the whisk.
Slowly
beat in 1/3 of the flour mixture and follow with ½ of milk. Mix in ½ of the
remaining flour mixture, beat in remaining milk, and finally mix remaining
flour mixture.
Using
the spatula mix the batter to make sure all is mixed in completely. Pour the
batter into the jelly roll plan and evenly smooth. Bake until a toothpick to
the center comes out clean, that is with no batter clinging to the toothpick;
17-22 minutes. 19 minutes was perfect for me.
Cool
for 1 hour, or until pan is no longer warm.
The Icing:
2
T. heavy cream pinch
of salt
1 t. vanilla extract 2 ½ sticks of butter, softened
4 t. instant coffee 2 ½ cups confectioners’ sugar
1 t. vanilla extract 2 ½ sticks of butter, softened
4 t. instant coffee 2 ½ cups confectioners’ sugar
 |
| See the peak it holds |
The Assembly:
Now set the edge of the lip to the corner of the cake (we want to get the most out of the cake, try to leave no gaps) and press down hard enough to make an impression. Follow the lines with the knife by making small up and down cuts. Pop the cake out by sliding the knife underneath. The first is a little difficult but it’s simple once you get the hang of it.
Now set the edge of the lip to the corner of the cake (we want to get the most out of the cake, try to leave no gaps) and press down hard enough to make an impression. Follow the lines with the knife by making small up and down cuts. Pop the cake out by sliding the knife underneath. The first is a little difficult but it’s simple once you get the hang of it.
 |
| Press down |
 |
| See the impression |
 |
| Pop cake out |
 |
| Cut the edge |
Get out a plastic bag and fill it with the icing. Cut the corner tip to create a piping bag. You can do the icing without a bag but it is so much easier with a bag. This frosting likes to separate (the butter from the other ingredients) in the bag so cut all the cakes out and then ice all at once with dolloping motions. Put on as much as you want.
This
is a great idea to do with friends, it would probably be quicker; I did it all
by myself and so the assembly took a little bit of time. And for a fun touch, place the 'cupcakes' in normal cupcake liners to take to parties and such.
 |
| Extra cake |
When
you can get to a point where you want to stop cutting out circles but have extra
cake, cut the scraps from the clean side and do with the scraps as you please.
Then put the remaining frosting on top and spread out for an even layer.
 |
| Finished 'cupcakes' |
And there you go, 'cupcakes' without a cupcake pan. Please comment if you have a recipe that you want me to try or a problem you have that you need help with.
Until I bake next, I'm Sarah
Peace
Peace


It looks so great~You are a good baker.I am not good at baking but I want to try it some day.
ReplyDelete